GMA showed another worthwhile freebie this morning that my mom passed on to me. Snapfish is offering a free flip book, you pay shipping, from now until December 13th. Just enter the coupon code GMAFREE when ordering. You can find more information on the website by clicking on the Good Morning America link on the home page.
Also, I missed the free Christmas card offer I wrote about before since we weren't scheduled to take family pictures until after the deadline. I searched around and found the best deals, by far, at Sams Club. I got 100 cards for $25! This includes the foil-lined envelope.
I've been busy, but I'll be back soon with more...

Tuesday, December 8, 2009
Monday, November 30, 2009
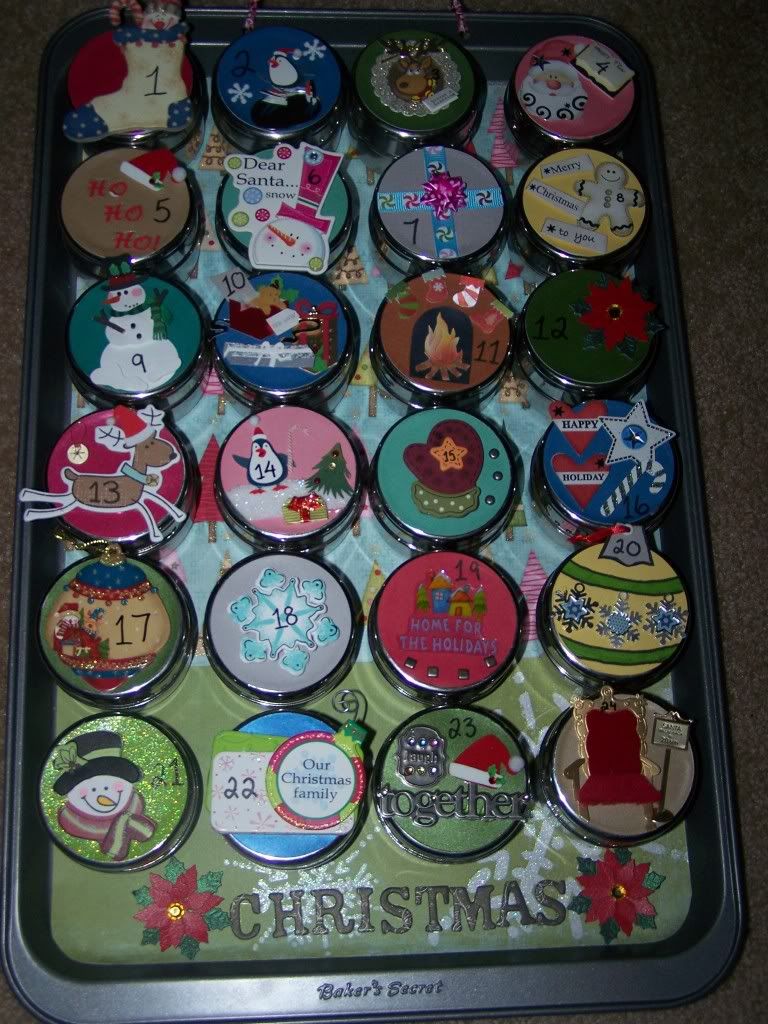
Unique Advent Calendars
Someone on my baby board mentioned Cookie Sheet Advent Calendars, and I had to Google them. Wow, are they precious! This would be such a fun project that you can absolutely personalize. Check some of them out below:
Craftzine
Christmas Countdown on Flickr
Scrapscene
Tater Tots and Jello
Little Miss Scrapalicious
Photobucket pic with magnetic tins filled with goodies for each day
Craftzine
Christmas Countdown on Flickr
Scrapscene
Tater Tots and Jello
Little Miss Scrapalicious
Photobucket pic with magnetic tins filled with goodies for each day
Friday, November 20, 2009
Great Product and Giveaway
I LOVE this idea. My sister, Amy, suggests on her blog that this would be a great necessity for transitioning Hannah to her big girl room in preparation for her baby brother. I completely agree. Go to Adam and Andrew's blog to learn more.

Sunday, November 15, 2009
Christmas Card Freebie
This is an offer too good to miss - 50 free photo cards. Make sure you order by November 30th!
Friday, November 13, 2009
Great new product
 What an awesome idea! I saw these the other day and wanted to pass it on to you. These are called McCormick's Recipe Inspirations. It's a recipe card with all of the pre-measured seasonings on the front. They come in a wide variety of recipes using pork, chicken, beef, and vegetables. Yum, and easy! I can't seem to find them online, but our local grocery stores carry them. Hope these will be helpful for the holidays!
Tuesday, November 10, 2009
Outta the fryin' pan
 I guess since I live in Texas I should be adept at fryin' stuff. Our State Fair hosts the biggest array of fried foods you can find; fried oreos, fried cheesecake, fried Snickers, and even fried butter. Surprisingly last week was the first time I'd ever fried anything. I wasn't sure how they'd turn out, but it was a huge hit, so I thought I'd share. We were having sirloin on the grill, and I was in the mood for potato chips or steak fries to go with them. Seeing how small the bottom-of-the-bag potatoes were, I chose the former.
 Alicia's Homemade Potato Chips
handful of potatoes, washed and dried
oil (I used canola because that's all we had)
1/4 Tablespoon seasoning salt
1/4 Tablespoon salt
1/4 tsp powdered garlic
1/2 Tablespoon white sugar
1/2 tsp black pepper
a dash of cayenne pepper
In a small bowl, mix all of the spices and sugar. Fill a pan about 1-2 inches full of oil, and heat over medium heat. While the oil is heating, use a mandolin to thinly slice your potatoes. Use one slice to test the oil. It should bubble up around the edges of the potato if it is hot enough. When it's heated, add a handful of potatoes. Turn them after 2 or 3 minutes. They'll take a total of about 5-7 minutes at this temperature, but fry them to your desired doneness. Scoop them out of the oil and onto a paper-towel-lined baking sheet. Immediately sprinkle generously with the spice mixture.
These will last a day or so in an airtight container, but they're best fresh. Enjoy!
Friday, November 6, 2009
Java
I am a coffee lover. Sadly I just cannot get any past my lips during the first (and some of the second) trimester. In the past couple of days I've been able to reintroduce coffee to my morning routine (decaf, in case you're worried). While I was grocery shopping the other evening, I picked up an egg nog, one of my favorite holiday treats, to use as coffee creamer. I just thought I'd share that it has been delicious and amazing! Try it. It's like an at-home version of an eggnog latte. Yum!
Thursday, November 5, 2009
Pumpkin Bread Pudding
 Last week I signed up to bring a dessert to Bible study. I wanted something pumpkin-y being the week before Halloween and finally Fall. I couldn't find any recipes for a pumpkin bread pudding that looked good, so I threw this together, and I ended up loving it. Thankfully I wrote everything down this time so I could post the recipe for future use. Here you go:
Alicia's Pumpkin Bread Pudding
Ingredients:
1 loaf of dense bread (I used a homemade - not by me - loaf of whole wheat)
6 eggs
1 1/2 cups half and half (or heavy cream or even whole milk)
1/3 cup apple cider
1 cup brown sugar
1 can pureed pumpkin
2 tsp pumpkin pie spice
Cube the loaf of bread, and spread into a well-greased 9x11 baking pan. Whisk the remaining ingredients until well-blended, and pour over the bread. Use the back of a spoon to press the bread down to ensure that it soaks up the custard, then refrigerate overnight.
Topping:
1/2 cup butter
1/2 cup brown sugar
2/3 cup apple cider
2 cups chopped nuts (I used pecans)
Melt the butter, brown sugar, and cider in a saucepan. Bring to a boil, and boil for 2 minutes. Remove from heat, and stir in the nuts. Pour over the bread pudding.
Bake at 350 for 45-55 minutes.
*I only added 1/3 cup of brown sugar to the custard mixture, and it was not enough. To combat the savory flavor, I made this caramel sauce to drizzle over the top. I loved it. If you make the sauce, make sure you reduce the amount of brown sugar you use in the custard so it is not too sweet.
Thankful Hands
I saw this cute recipe this morning and thought I'd share. What a sweet project for Thanksgiving.
Thursday, October 29, 2009
Cake Balls 101
Have you ever made cake balls? My sister-in-law made some probably 3 or 4 Christmases ago, and they've been a holiday staple ever since. Here's the how-to for an easy but impressive treat.
Bake a boxed cake according to package directions. You can use any flavor you like. I wanted something seasonal, so I made a carrot cake this time. Don't worry about making it look good because you will be crumbling the entire thing when it comes out of the oven.
While it's still warm, crumble the entire cake into a bowl.
Dump in a container of store-bought icing, and stir to combine. To go with the carrot cake, I added cream cheese icing.
Now refrigerate this mixture until it is firm enough to form into balls when rolled. They'll need to hold their shape well. I typically bake the cake in the evening before I need them, mix it with the icing, then refrigerate overnight.
When the mixture is firm, use a tablespoon to measure out enough dough for each ball, then form it into balls using your hands. Place the balls on a parchment-lined tray, and refrigerate again for an hour or so.
 Once they come out of the refrigerator, you'll be coating them with chocolate or with candy melts. I chose these candy melts to combine to make orange. You can find these in the cake decorating section at most craft stores. I've even seen them at WalMart. One word of caution - these sometimes come flavored. Double-check that they're vanilla. The orange ones I saw were orange-flavored. Yuck!
 While you're melting these according to package directions, get your workspace ready. You'll need everything within reach. Get another parchment-lined tray ready to hold your cake balls while they harden.
 There are many techniques for coating them. The easiest way for me is to melt the candy melts into a medium bowl. I use a fork, a spoon, and a toothpick for this process. I drop one of the cake balls into the melted mixture, spoon the mixture over the top to cover, then scoop it out on the tongs of the fork. I tap the fork on the bowl to remove any excess coating. Then I use a toothpick to carefully slide the ball off the fork and onto the parchment. Immediately sprinkle the top with your topping of choice before the coating has a chance to harden. I used sprinkles this time, but you could decorate these to look like mini pumpkins.
 When they harden (shouldn't take more than 15 minutes or so) transfer the batch to a tupperware container to store in the refrigerator until you're ready to eat them.
There are many more skilled cake ball artists than I. Check out Bakerella's blog for some amazing how-to's!
Place the balls on a parchment-lined tray, and refrigerate again for an hour or so.Once they come out of the refrigerator, you'll be coating them with chocolate or with candy melts. I chose these candy melts to combine to make orange. You can find these in the cake decorating section at most craft stores. I've even seen them at WalMart. One word of caution - these sometimes come flavored. Double-check that they're vanilla. The orange ones I saw were orange-flavored. Yuck!While you're melting these according to package directions, get your workspace ready. You'll need everything within reach. Get another parchment-lined tray ready to hold your cake balls while they harden.There are many techniques for coating them. The easiest way for me is to melt the candy melts into a medium bowl. I use a fork, a spoon, and a toothpick for this process. I drop one of the cake balls into the melted mixture, spoon the mixture over the top to cover, then scoop it out on the tongs of the fork. I tap the fork on the bowl to remove any excess coating. Then I use a toothpick to carefully slide the ball off the fork and onto the parchment. Immediately sprinkle the top with your topping of choice before the coating has a chance to harden. I used sprinkles this time, but you could decorate these to look like mini pumpkins.When they harden (shouldn't take more than 15 minutes or so) transfer the batch to a tupperware container to store in the refrigerator until you're ready to eat them.There are many more skilled cake ball artists than I. Check out Bakerella's blog for some amazing how-to's!
The combinations are endless for these. You could do red velvet cake, cream cheese frosting, white chocolate coating, and crumbled candy canes on top. Or chocolate cake, vanilla frosting, milk chocolate coating, and crushed oreos on top. Try your favorite combo.
One last tip - these travel and ship very well. When my brother-in-law was deployed over his birthday, we made a batch of his favorite cake and icing combo, froze them overnight, and shipped them to Afghanistan. He said they arrived in one piece and gave him a taste of birthday cake on his special day.
Please share your flavor combination ideas in the comments! I'm always looking for new ones to try.
Tuesday, October 27, 2009
Family Cookbook Lemon Blossoms
Ingredients:
1 18.5 oz pkg yellow cake mix
1 3.5-oz pkg instant lemon pudding mix
¾ cup veg. oil
4 large eggs
For glaze:
½ cup fresh lemon juice
grated zest of 1 lemon
3 Tbsp veg. oil
3Tbsp water
4 cups powdered sugar
Directions:
Preheat oven to 350o. Spray mini muffin tin with cooking spray. Combine the cake mix, pudding mix, eggs, and oil and blend with a mixer until smooth. Pour one tablespoon of batter into each muffin cup. Bake for 10-12 minutes (tops should not brown). Turn out onto a towel or wax paper. To make the glaze, sift the powdered sugar into a mixing bowl. Add the lemon juice, lemon zest, vegetable oil, and water. Mix until smooth. Dip the muffins into the glaze while still warm covering as much of the muffin as possible. Place on wire rack with wax paper underneath to catch excess glaze. Let the glaze set (about an hour) before serving or storing.
Monday, October 26, 2009
Pumpkin Head Fun
Here's a cute, free download appropriate for this week. Just print, color, cut, and glue. Enjoy!
Sunday, October 25, 2009
Candy Corn Bags
 This is cute, cute, cute. We always try to make special treats for our neighbors at holiday times, and this will be the perfect way to package them. If you don't know how to use the sewing machine, you can easily hand-stitch these.
Monday, October 19, 2009
Family Cookbook Cinnamon Bread Breakfast Casserole
Ingredients:
1 loaf cinnamon swirl bread, cubed
8 eggs
1 8-oz pkg cream cheese, cubed
2 cups milk
1 stick butter, melted
½ cup maple syrup
Directions:
Layer a 9x13-inch pan with half of the cubed bread. Sprinkle with cream cheese cubes, then layer the rest of the bread on top. Mix eggs, milk, butter, and maple syrup in a bowl. Pour mixture over the bread and mash down with a spatula. Refrigerate overnight, covered. Uncover and bake at 350 o for 30 minutes.
Notes: Freezes well. Top with more maple syrup if desired!
Thursday, October 15, 2009
Family Cookbook Reuben Casserole
Ingredients:
1 cup sour cream
salt and pepper to taste
1 onion, chopped
1 loaf dry rye bread
1 12-oz can corned beef, chopped
1 16-oz can sauerkraut, drained
1 Tbsp crushed red pepper flakes
8 oz shredded Swiss cheese
¼ cup butter
Directions:
Mix sour cream, onion, sauerkraut, crushed red pepper flakes, salt, and pepper together in a bowl. Spoon the mixture into a 9x13-inch baking dish. Sprinkle the corned beef over the sauerkraut mixture. Crumble bread in a food processor (or by hand), and spread the crumbs over the top of the casserole. Sprinkle with the shredded cheese. Melt the butter and drizzle over the casserole. Bake at 350 for 30-35 minutes until top is browned and casserole is bubbling.
Monday, October 12, 2009
Personalized Money

This is a really fun website for creating personalized money. This can be used for birthday gifts, party favors, or even allowance for little ones. Have fun!
Sunday, October 11, 2009
Family Cookbook Mushroom Stuffing
Ingredients:
1 loaf French bread, cubed
1 Tbsp garlic salt
4 stalks celery
1 Tbsp curry powder
3 sticks butter
2 tsp black pepper
1 (10 oz) pkg sliced white mushrooms
2 large eggs, beaten with 2 Tbsp water
Directions:
Preheat oven to 250o. Scatter the bread cubes on a baking sheet and bake until dried out, but not browned (approx. 40 minutes). Let cool. Increase oven temperature to 350 o. In a large skillet, melt butter over medium-high heat. Add onions, celery, and mushrooms, cooking until softened. Stir in garlic salt, curry powder and pepper until combined. In a large bowl, toss the bread cubes with the beaten egg mixture. Add the vegetable mixture and toss until well combined. Spoon the stuffing into a buttered casserole dish. Bake uncovered for 40 minutes.
Saturday, October 10, 2009
X Marks the Spot
 If you're looking for a great family hobby, I would highly suggest geocaching. It's a modern-day, high-tech treasure hunting activity designed for all ages and skill levels. And, with almost a million caches around the world, it's a hobby that will travel with you wherever you go. I joined the program and searched for local caches today and was shocked at how many are within walking distance of my house.
The basics of geocaching require a hand-held GPS device and Internet access. Visiting and joining (for free!) http://www.geocaching.com/ will give you detailed descriptions and locations. Find a cache you'd like to hunt for, enter it into your GPS, then have fun searching. Each cache is different. Some contain a trinket you can take and ask you to leave one in its place. Some have a log to record the date you found it and your name and hometown. At any rate, geocaching looks to be a really fun and inexpensive adventure for your family. I can't wait until my growing family is all old enough to understand and enjoy the hunt!
If you've already begun your geocaching adventures, I'd love to hear your stories in the comments!
Monday, October 5, 2009
Family Cookbook Pumpkin Pie Spread
Here's a recipe perfect for this time of year. I've heard there's a canned pumpkin shortage this year. You can easily substitute fresh roasted pumpkin. Just cut a pumpkin pie pumpkin in half, and remove the seeds. Place cut-side down into a casserole dish filled with 1 inch of water, and bake at 400 degrees until soft. Fork mash.
Ingredients:
1 pk cream cheese, softened
1 pk cream cheese, softened
1 cup canned pumpkin
½ cup packed brown sugar
1 ½ Tbsp orange juice
2 tsp cinnamon
2 tsp cinnamon
2 tsp ground cloves
Directions:
Whip ingredients together until fully combined and smooth. Serve with gingersnaps.
Directions:
Whip ingredients together until fully combined and smooth. Serve with gingersnaps.
Sunday, October 4, 2009
Good-smelling vacuum
I've always had a problem with the vacuum exhaust stinking - probably because I've always had a dog. Our dog is an indoor dog who is very clean and gets regular baths and grooming, but it doesn't seem to keep my vacuum from stinking up the house when I use it. I've resorted to using a very inexpensive vacuum cleaner because replacing the filters is so expensive. Anyway, I heard a trick and tried it without much hope, but it's completely solved my stinky vacuum problem. Just stick a scented drier sheet in the bag (if it's bagless, you can throw it in the canister), and the exhaust will smell fresh and clean. It works tremendously. I am almost at the point of having to replace the bag again, and it still smells as fresh as it did the first time I used it. Nice!
Saturday, October 3, 2009
Friday, October 2, 2009
Basil Oil
We are a big bread-eating family around here. To accompany pasta dishes, soups, etc., I often make a loaf of foccacia bread or buy some crusty bread to break and dip in marinara sauce or olive oil. I recently saw an idea for infusing olive oil with basil to use as a dipping oil. Since I'm still bursting at the seams with my basil bounty, I thought I'd share.
Basil-infused Olive Oil
1 cup olive oil
3 stems of basil (no need to use the leaves even, just stems)
In a saucepan, warm the olive oil over low heat. Add the stems and simmer for 20-30 minutes. Store in the refrigerator for up to one week.
Serving suggestion: In a shallow plate, drizzle enough olive oil to cover the surface. Top with fresh cracked pepper and Italian seasoning. Use it to dip crusty bread. Yum!
Thursday, October 1, 2009
I'm back!
Late summer was a doozy for us, and I appreciated the time away from this blog. I did, however, write down tons of ideas in my time off to add when I got back. In the interest of the reason I took a break in the first place (I'm pregnant!), I thought I'd start with a precious keepsake idea that I recently heard about to record your baby's first sounds.
Build-a-bear allows you to record your own sounds to a sound box they will stuff into the animal for you. Choose two of the recorders. Take one with you to one of your prenatal appointments where you will hear the heartbeat, and record the sound. Take the second to the delivery room to record your baby's first cries. Then you can put one into each hand of the bear you pick out. Precious!
Build-a-bear allows you to record your own sounds to a sound box they will stuff into the animal for you. Choose two of the recorders. Take one with you to one of your prenatal appointments where you will hear the heartbeat, and record the sound. Take the second to the delivery room to record your baby's first cries. Then you can put one into each hand of the bear you pick out. Precious!
Friday, September 4, 2009
Bloggie Vacation
I just wanted to let everyone know that I'm taking a brief break from this blog. I've found myself really busy lately and needing to concentrate on some new endeavors this Fall. I will be back in early October, and I can't wait! See you all back here then.
Friday, August 28, 2009
Canning 101
I've been asked a few times about canning - tools, processes, recipes, etc. I am in no way equipped to teach canning quite yet as I've done it a grand total of ONCE. =) But I'd love to guide you to a great resource. One of my favorite blogs is The Pioneer Woman. She breaks her blog into several sections, one of which is a cooking blog. I was elated when she decided to do a Canning 101 lesson. If you're interested, check it out!
Monday, August 24, 2009
Loaded Veggie Personal Pizza, Toddler-Style
 Hannah loves pizza, and I make it often for dinner. But I found this cute idea for a quick lunch that I couldn't pass up. Thought I'd share as a way to load up the veggies for your little one.
Toddler-Style Veggie Pizza
1/2 English muffin (I buy the whole wheat, flax, and extra fiber ones, and they're awesome)
marinara sauce
veggies
cheese
On the pizza pictured above, I mashed a handful of black beans and spread it on the English muffin. I topped that with a little marinara sauce, shredded carrots, then some baby spinach. Top with a sprinkle of your toddler's favorite cheese. Broil for 5 minutes (or toast in your toaster oven). Really, you could just microwave it as well.
Enjoy!
Sunday, August 16, 2009
Many mouths munch mouthwatering manna. Mine? Mere morsels.

 Gardening. Ugh. Seems the aphids, bunnies, cardinals, blue jays, ants, roly poly's, etc. are enjoying my labor way more than we are lately. My basil and jalapenos are still flourishing. Everything else? Not so much. The cucumbers are tough and are trying desperately to resist all of the garden pests. But, as soon as one will ripen, someone other than myself helps himself. We've sprayed and sprayed with all sorts of pest control, but to no avail.
 Thankfully I've used basil at least thrice weekly since it was planted, I've given tons away, and early on in the summer I picked at least 2 cucumbers daily. We once had green beans nightly, banana peppers every few days, and tons of cilantro too. Not even the pervasive zucchini has escaped unscathed. I haven't had a single one! I'm still trying, but I think it may be time to count my losses. Bummer.
Saturday, August 15, 2009
Canned

 A couple of Christmases ago I got all of the equipment needed to can homemade jellies, jams, sauces, etc. Unfortunately life has happened since then leaving me little time to learn a new domestic skill of the like. Friday I pulled everything out to make use of a huge container of strawberries left over from all of our recent company. I bought some rhubarb and made strawberry-rhubarb preserves. It was so rewarding that I used the afternoon to whip up some pepper jelly from the jalapenos from my garden and from my parents' garden. They both turned out well, and I will definitely be canning more in the future...just as soon as I can rid the kitchen of all of the stickiness. Canning is a huge mess!
Recipes can be found here and here.
Flower Arrangement Tip
 I almost always decorate with fresh flowers for get togethers and events I have at my house. I typically buy them at Sam's Club because they're such a steal. But I was doing some last-minute shopping at Tom Thumb before our family reunion brunch, and their flowers are outrageous compared to Sam's. I found a bunch of already-prepared bouquets that were cheesy but expensive. But their alstromerias (one of my favorite flowers - they last for weeks) and sunflowers were on clearance for $3 per bouquet. I used a tip I saw on Martha Stewart years ago and made my own arrangement that I liked much better than any of the bouquets I saw...and for $6!
Grab a handful of flowers that coordinate well. Make a bouquet in your hand shaping and stuffing as you go and holding the stems firmly in place. When you've used the amount of flowers you're happy with and have them arranged where you like them, slide a clear elastic ponytail holder as high as you can up the stems to hold them in place. Cut the stems to the same length and place in your vase. The bouquet will stay exactly how you arranged it, and you won't be able to see the elastic through the glass. It works every time.
Friday, August 14, 2009
Peppers Aplenty
 ...unfortunately, after the aphid infestation, they're the only thing that's "aplenty" in the garden these days.
(I have no idea why Blogger won't post this as I've saved it, but I have to settle for sideways.)
Thursday, August 13, 2009
Coq (f)au(x) Vin - the recipe that would make Julia Child roll over in her grave
Please, for the love of all things authentic, go here and make the original recipe that I based this off of.
Saturday morning I had the privilege of accompanying my mom, sister, and mother-in-law to the movie theater to see Julie & Julia. If you haven't seen it, GO! It was such a cute and fun movie. And it gave me a hankering to try my hand at something French. Lo and behold, The Pioneer Woman chose that time to post her Coq au Vin recipe. We had family in town for over a week and had a ton of leftover ingredients that mostly resembled the ingredients needed in this recipe. I can imagine that the real thing is mounds better than my pitiful copy, but my copy was so good it is worth posting.
So, if you feel so inspired, here's my easy pantry version:
Alicia's Coq (f)au(x) Vin
4 strips of bacon, chopped
3 chicken breasts, salt both sides
1/2 white onion, chopped
3 large carrots, chopped
4 cloves garlic, chopped
1 tablespoon butter
1 tablespoon flour
2 cups red wine (I used Cabernet Sauvignon)
Preheat oven to 350 degrees. Meanwhile, cook bacon until the fat is rendered, but before it is crispy, in a large skillet over medium heat. Remove the bacon with a slotted spoon leaving the fat in the skillet. Brown the chicken over medium-high heat in the bacon fat. Cook on each side approximately 3 minutes or until golden brown on each side, but not cooked through. Remove the chicken, and keep warm. To the skillet, add the onion, carrot, and garlic, and cook until translucent (approx. 4 minutes). Remove veggies with a slotted spoon, and drain the remaining fat from the pan. Return the pan to the heat, and add the butter. As soon as it melts, whisk in the flour stirring until golden brown. Slowly pour in the wine whisking constantly. Simmer over medium heat until thickened slightly (approx. 4-5 minutes) stirring frequently and scraping the bottom of the pan to incorporate the brown bits left from the chicken and veggies. Return the chicken to the pan with the sauce, and turn to coat.
Butter or grease a 2-quart baking dish. Spread half of the veggies and bacon in the bottom, top with the chicken, then sprinkle the rest of the veggies and bacon on top. Pour the remaining sauce over the dish. Bake, covered with foil, for 1 hour 15 minutes. Prepare to be overcome. =)
I served mine with buttered, grilled rolls. The Pioneer Woman suggests serving alongside buttered noodles, but we preferred the bread to slop up the extra sauce.
Sunday, August 2, 2009
Mary Makeover Update
I just had to pop in to say that I am relaxing on the couch still in lounging-around-the-house clothes. AND I had a big pancake breakfast and delicious coffee. AND we all played for over an hour this morning together.
This is novel because I have company coming this afternoon (my sister from Washington), and I'm not frantically cleaning. I need to mop the floor in the family room, and that's it! This new plan has been awesome. I feel like I barely do any work, and yet the house is spotless. I hope you'll try it if you're looking for a plan. It certainly has made an impact around here.
This is novel because I have company coming this afternoon (my sister from Washington), and I'm not frantically cleaning. I need to mop the floor in the family room, and that's it! This new plan has been awesome. I feel like I barely do any work, and yet the house is spotless. I hope you'll try it if you're looking for a plan. It certainly has made an impact around here.
Semi-homemade Croissants
 We always have a stash of refrigerated tubes of croissant dough on hand. But sometimes I get tired of the plain croissants, and I love to beef them up a bit. I just roll out the dough, sprinkle on some toppings, and bake according to the directions. These are asiago cheese, parsley, and garlic.
Other ideas: cinnamon and sugar, pumpkin pie spice, fresh basil with spaghetti sauce and mozzarella, salsa and cilantro, garlic and parmesan, jam, etc. Possibilities are endless.
Saturday, August 1, 2009
The salad for which I needed the candied walnuts
 Strawberry Feta Salad
1 small head of red lettuce
1 bunch of spinach
1 pint strawberries
1 cup candied walnuts
1/2 red onion, sliced
1/4 lb feta cheese
salt and pepper to taste
poppy seed dressing - I use this kind
Basically, just wash all the veggies, throw them in a bowl, and top with everything else. =) One of the things I do when making a salad is to salt and pepper the lettuce before adding the toppings...adds much-needed flavor.
Enjoy!
Friday, July 31, 2009
Candied Walnuts
Warning: If you lack self control, do not make these! I am having a very hard time not devouring them, and I really want them to be around to top my salad tonight.
I am notorious for hanging out in the kitchen creating things that I end up loving but that I cannot recreate because I don't remember what I did. That's why I am loving this website. It is holding me accountable for writing things down as I go so I can share them and record them here. I bought some walnuts last night in bulk on a whim. I decided to candy them for a salad topping, but I couldn't find a recipe that looked good. I didn't want Christmas-y cinnamon walnuts, but a more fruity, summer flavor. I came up with this recipe and love it. If you do want a different flavor, this recipe is easy to adapt. Just omit the fruity ingredients, and add your favorite spices instead.
 Alicia's Candied Walnuts
approximately 1 cup of walnut halves - can be a little more or a little less
1 cup sugar
1 tablespoon blackberry preserves (you can use any type of preserves in your fridge, or you can skip this entirely)
1 tablespoon orange juice
6 tablespoons milk
1 tablespoon vanilla
Preheat your oven to 350, and toast your walnuts on a baking sheet (approximately 8-10 minutes). Check them to make sure you don't overdo it!
Meanwhile, cook sugar, preserves, juice, and milk over medium heat until a candy thermometer reads around 235 degrees (again, approx. 8-10 minutes). The temperature does not have to be exact. You'll want the mixture to have thickened and to coat the back of a spoon. Remove from the heat, and stir in the vanilla. At this point, dump in your walnuts, stir them to coat, then pour the mixture onto a piece of wax paper. Immediately spread your walnuts out (use a fork, it is HOT!) so they are not touching. Let cool on the counter, then break up and store in an airtight container.
I chose to chop these before toasting and coating, but they work well either way. Also, if you put these in a cute jar and tie it with a pretty ribbon, they'd make a great gift. Enjoy!
Thursday, July 30, 2009
Granola
 My sister posted the perfect basic granola recipe on her Facebook page. I made it for Chris to take to work, and now he's hooked. As soon as his supply runs out, I make another batch. It's delicious and very, very versatile. Here's the basic recipe followed by the things I added to make this Rocky Road granola. Yum!
Ingredients
18 ounces of old-fashioned oats (not quick-cooking)
1 cup shredded coconut
1/2 cup brown sugar
1 c. chopped nuts (optional)
a few dashes of your favorite spices
1/3 cup veg. oil
1/2 cup honey (more or less depending on your desired level of sweetness...I tend to use less)
4 T. molasses
4 T. maple syrup
2 T. vanilla
In a microwave-safe dish, heat the oil, honey, molasses, and syrup until it is thin enough to stir and combine. Add vanilla. In a separate bowl, combine all of the dry ingredients. Pour the wet ingredients over the top, and stir to combine. Bake at 300 degrees on a foil-lined baking sheet (or a heavily sprayed sheet - it'll stick) for about 30 minutes. This is the hardest part, as sometimes it cooks faster/slower, so check and stir every 5 minutes or so. It will not be crunchy when it's done, just lightly browned. Allow to cool, and it will become nice and crisp!
For the Rocky Road, add 1/4 cup of peanut butter to the wet mixture. After baking, stir in 1/4 cup of marshmallows and 1/4 cup of chocolate chips stirring to combine.
Other variations: dried cherries and chocolate chips, dried cranberries and white chocolate chips, candied or dried fruits.
Wednesday, July 29, 2009
FUN website!
If you're a sucker for design and party ideas like I am, this is a great place to spend some time.
Sunday, July 26, 2009
My Mary Makeover, Troubleshooting
I think the plan I've come up with is really going to work for me, but I completely acknowledge that there are definitely going to be forces working against me. Namely, Hannah and sometimes Chris. =) I have never successfully run a household filled with children, but I have successfully run a classroom filled with children. My classroom was always neat, tidy, and clean. Here are some of my ideas for keeping the childhood clutter to a minimum:
1) Make sure there's a place for everything. Clutter can't be put away easily if there is not a designated place for it to belong. If your kids are old enough to sort their toys when putting them away, make sure the bins are clearly labelled making it easy for the kids to find the proper spot. In my classroom each type of toy was in its own container. I took a picture of each toy, and put the pic on the front of the bin where it belonged.
2) I have toy bins (baskets, trunks, and other decorative containers) in the family room, Hannah's bedroom, kitchen, and the playroom for toys. That way things can be quickly tossed into a bin instead of organized, sorted, and returned to the room they belong in a pinch.
 3) If you have multiple children and, therefore, multiple homes for different toys, I saw this great idea that I will definitely institute when we have more kids. You can personalize them with an initial, decorate them with fabric that would match a child's room, or assign each child their own color to make it especially theirs. Then hang it on their bedroom's door knob to collect random trinkets that have been left lying around throughout the day.
4) When I'm collecting clutter, I typically walk around the house with a laundry basket. I'll go on a mission to find everything that belongs in our master bedroom, put it in the basket, and carry it to that room. I usually repeat for each room. This way you only have to make one trip to each room instead of multiple trips with multiple handfuls.
5) Enlist your kids in the cleaning process. You can assign them age-appropriate chores for the Zone of the day. For example, if it's kitchen day, hand your toddler a bag, and let them go to town picking up crumbs off the floor. Or you can allow them to help to clean the face of appliances by soaking a paper towel in vinegar. They can wipe to their heart's content without having to handle harsh chemicals. Have your preschoolers help with making their beds, sorting laundry, etc. Of course, you'll have to accept an outcome that is developmentally-appropriate. When it's time to pick up toys, make it into a game. You can have a special hat (think decorated hard hats or a silly child-decorated baseball cap or visor) that the kids don for cleaning. Set a timer, grab the hats, and let the kids go to town. And don't forget the power of a simple sticker chart for your little helpers. Let this be a reward-only system and not associated with punishment to keep it fun and upbeat.
I think the thing I'm going to have to keep in mind when Hannah's older (and when we add more children to the mix) is that my standard of perfection will have to be compromised if I want Hannah to help cheerfully. If I go behind her "fixing" her accomplishment, I'll steal the sense of pride. If I demand perfection, I'll end up in the looney bin, and she'll never want to help fearing my disapproval. So a valiant effort should be rewarded and the imperfections ignored.
I hope this system works well for you. If you have any ideas, questions, or concerns, please feel free to comment!
1) Make sure there's a place for everything. Clutter can't be put away easily if there is not a designated place for it to belong. If your kids are old enough to sort their toys when putting them away, make sure the bins are clearly labelled making it easy for the kids to find the proper spot. In my classroom each type of toy was in its own container. I took a picture of each toy, and put the pic on the front of the bin where it belonged.
2) I have toy bins (baskets, trunks, and other decorative containers) in the family room, Hannah's bedroom, kitchen, and the playroom for toys. That way things can be quickly tossed into a bin instead of organized, sorted, and returned to the room they belong in a pinch.
3) If you have multiple children and, therefore, multiple homes for different toys, I saw this great idea that I will definitely institute when we have more kids. You can personalize them with an initial, decorate them with fabric that would match a child's room, or assign each child their own color to make it especially theirs. Then hang it on their bedroom's door knob to collect random trinkets that have been left lying around throughout the day.4) When I'm collecting clutter, I typically walk around the house with a laundry basket. I'll go on a mission to find everything that belongs in our master bedroom, put it in the basket, and carry it to that room. I usually repeat for each room. This way you only have to make one trip to each room instead of multiple trips with multiple handfuls.
5) Enlist your kids in the cleaning process. You can assign them age-appropriate chores for the Zone of the day. For example, if it's kitchen day, hand your toddler a bag, and let them go to town picking up crumbs off the floor. Or you can allow them to help to clean the face of appliances by soaking a paper towel in vinegar. They can wipe to their heart's content without having to handle harsh chemicals. Have your preschoolers help with making their beds, sorting laundry, etc. Of course, you'll have to accept an outcome that is developmentally-appropriate. When it's time to pick up toys, make it into a game. You can have a special hat (think decorated hard hats or a silly child-decorated baseball cap or visor) that the kids don for cleaning. Set a timer, grab the hats, and let the kids go to town. And don't forget the power of a simple sticker chart for your little helpers. Let this be a reward-only system and not associated with punishment to keep it fun and upbeat.
I think the thing I'm going to have to keep in mind when Hannah's older (and when we add more children to the mix) is that my standard of perfection will have to be compromised if I want Hannah to help cheerfully. If I go behind her "fixing" her accomplishment, I'll steal the sense of pride. If I demand perfection, I'll end up in the looney bin, and she'll never want to help fearing my disapproval. So a valiant effort should be rewarded and the imperfections ignored.
I hope this system works well for you. If you have any ideas, questions, or concerns, please feel free to comment!
Saturday, July 25, 2009
Baby stuff

I heard a great tip a few weeks ago about swim diapers. Did you know that you can wash and dry them with the regular laundry and reuse them as long as they are only wet and not soiled? Awesome money savings! I was a little skeptical thinking they'd lose their elasticity and their ability to hold the urine, but they don't at all. Good as new. Of course, if you so desire, you could just buy the cloth swim diapers. But we got a pack of Pampers swimmies last Labor Day when we went to Georgia (and to my sister's pool) and couldn't find anything smaller than a size 3. Hannah's still in size 3 diapers, and I'm still on the first pack of those diapers we've ever gotten.
 Secondly, Hannah got her 15-month shots and the very next day started to cut all 4 canines (eye teeth). I've heard horrible things about these teeth coming in, and Hannah definitely suffered (and she's still at it). She spiked a 101 fever from the shots and teeth combo, and she developed a horrible diaper rash. She would scream and writhe in pain when we'd change dirty diapers, and it was heartbreaking. We ran out of wipes, and Chris went to the store for me. He came back with a different wipe than I normally get (Huggies Naturally Refreshing with Green Tea), and I was leery to try new wipes on such a rashy rear. When I used them for the first time, I was shocked. Hannah didn't even flinch! Her rash was no better than it was when I used my old standard (Huggies sensitive skin - no dyes or perfumes), but she showed no discomfort at all. When we were out and about, she screamed again at the use of the sensitive skin wipes that are in the car. Then again, when we got home, she didn't react at all to the new ones. So, for once, the claim on the packaging seemed to ring true for us. It's worth a shot!
Friday, July 24, 2009
Mary Makeover, Part Three
Do you have a compiled list of everyday chores and Zone chores? If so, it's time to create a routine that will work for you. First, decide which days you'd like to have off. For me, those days are Saturday, Sunday, and Monday. I'll do my best to maintain my cleaning routine Tuesday - Friday.
Next, decide how you want to tackle your list of daily chores. For example, I am already in the habit of loading the dishwasher each night and programming it to run while we're sleeping, handwashing the dishes that need it, then wiping down the sink and countertops. Then in the morning I unload the clean dishes. I'll make my bed as soon as I get out of it, and sweep the floor just after Hannah goes to bed - all routines already firmly established. Once I get into a routine of doing something, it just seems easy, so routines are key for me.
Lastly, carve 30 minutes out of your day that is consistent(ish) to tackle that day's Zone chores. Hannah takes a good, consistent, long nap each morning. Afternoon naps are always iffy. So I'm planning my Zone cleaning for the mornings and not the afternoons. I want to have a time I can count on.
Here's where the Zone cleaning gets flexible. My house is not always picked up enough to just be able to focus on the regular chores. Usually my routine has to involve de-cluttering and picking up before I can get to the table/floor/counter to clean it in the first place. I spend my time de-cluttering and wipe myself out before I get to the cleaning part. In this case, spend 30 minutes in that day's Zone tackling one project. For example, we had a last-minute big family gathering at our house on 4th of July weekend. To "clean" I literally picked up every piece of clutter/extra baskets and bins/etc. and threw it into our bedroom. Instead of cleaning our bedroom the other day, I just spent that time organizing and finding a home for all of the random odds and ends that were thrown in there. I'll clean it the next time that Zone rolls around. It's nice because it doesn't make that Zone overwhelming. Another example of organizing instead of cleaning would be for my guest bedroom. It's not a dusty room, and the floor doesn't get a lot of action, so the cleaning is minimal. The armoire, however, is a disaster inside. So one day I might (emphasis on might) decide to spend that 30 minutes organizing the armoire instead of cleaning.
What about the deep-cleaning issues like the inside of the refrigerator, scrubbing grout, and cleaning blinds? I'm going to use one day per week to do deep-cleaning in one Zone. Next week is deep-cleaning week for Zone 1. So the only day I'll actually tackle more than just the easy surface stuff is Tuesday.
I must say that this plan has made me excited and motivated about possibly being able to consistently maintain a tidy house for the first time in my life. I would really like to have a well-established routine before we introduce even more family members so I can stay on top of stuff and avoid my marathon cleaning rituals before we expect company. Having a consistently clean house seems impossible, and I'm thrilled that this plan is doable. I will be completely honest, though, and share my failings openly. Please let me know if you're using any part of the plan and how it's working for you!
Thursday, July 23, 2009
Mary Makeover, Part Two
The next step in my housecleaning planning was to separate my house into cleaning zones. I used these rules when determining the zones:
1) I only wanted to have 4 days of zone cleaning, so I separated my house into 4 zones
2) In order to make the cleaning approximately the same amount of time each day (my goal is 30 minutes or less), I separated the zones accordingly. (i.e. The kitchen takes a long time, the guest bedroom and Hannah's room don't. So the kitchen is one zone by itself, and the secondary bedrooms are grouped together.)
3) Proximity is important so you don't have to lug tools across the house all morning. Make the zones in the same basic area.
I have a 1450 square foot home with 3 bedrooms and 2 bathrooms, so four zones are very reasonable. If you have a bigger, more complex house, you'd probably need more zones. My zones are as follows:
Zone 1 - Kitchen and Laundry Room
Zone 2 - Main Living Areas (Foyer, Dining Room, Family Room)
Zone 3 - Secondary Bedrooms, Bathroom, and Hallway
Zone 4 - Master Bed and Bath
The next step was to define all of the weekly maintenance items that need to be done in each zone. These are not the deep-cleaning things that really only need to happen once a month (or less!). Here's my example for the kitchen:
Clean counters and sink
Clean the surfaces of the microwave, dishwasher, and refrigerator
Scrub cooktop
Dust shelves
Clean coffee pot
Clear cobwebs
Sweep and mop floors
Notice that this list does not include things like cleaning out the refrigerator, organizing the pantry, etc. So, in its entirety, my job in the kitchen should take between 15 and 30 minutes.
Happy Zoning!
Wednesday, July 22, 2009
My Kitchen Decision Progress
Alternately Titled: "Why My Husband is Shaking His Head" I got a resounding lighter-cabinet response from my last kitchen makeover post. I already had the materials I'd need to test it out, so I did one cabinet door yesterday, and I love it! For some reason painting those wood cabinets was intimidating to me...so permanent! But the second the paint touched the surface, I was hooked. I used a color called "Muslin Wrap" which was a muted white, and I made my own glaze with glazing medium and a walnut stain.
Here's why my husband is shaking his head - I don't like the distressed finish on the cabinets next to the distressed finish on the walls. Instead of wanting to just paint the cabinets one solid colors so they coordinate better, I think I want to do the distressed cabinet and paint the walls a solid color. Oh boy. It took us forever to do the kitchen walls. We had wallpaper, a wallpaper border, and some textured walls before. We removed wallpaper, primed the walls, did the texture, painted, then glazed. This alone sounds daunting, but you have to factor that we have a lot of wall space and that our walls are 14-feet tall in the kitchen. Ugh. It took so long to complete. When I was finished, I was not 100% pleased, but it was so much work, we lived with it. The problem is that the glaze is really hard to get to look even and natural when your walls are so big. There are parts where the glaze took differently and is shiny, and places where it's dull. There are places where the glaze dried more before it was wiped off and is smudgy-looking. People say they don't notice, but I do. Also, there are several places that were nicked or were pulled off by painter's tape. I tried to touch them up, but it's very obvious. To really hide the imperfections, the walls would have to be re-done. All this being said, I'm actually considering painting the walls. I would probably do a muted olive green, much like the average between the two tones now but with no glaze. I went to Lowe's last night for a thousand paint chips which I have in the kitchen staring back at me.
I'll definitely keep you posted on the progress as I make up my mind. Thanks for all your help!
I got a resounding lighter-cabinet response from my last kitchen makeover post. I already had the materials I'd need to test it out, so I did one cabinet door yesterday, and I love it! For some reason painting those wood cabinets was intimidating to me...so permanent! But the second the paint touched the surface, I was hooked. I used a color called "Muslin Wrap" which was a muted white, and I made my own glaze with glazing medium and a walnut stain.Here's why my husband is shaking his head - I don't like the distressed finish on the cabinets next to the distressed finish on the walls. Instead of wanting to just paint the cabinets one solid colors so they coordinate better, I think I want to do the distressed cabinet and paint the walls a solid color. Oh boy. It took us forever to do the kitchen walls. We had wallpaper, a wallpaper border, and some textured walls before. We removed wallpaper, primed the walls, did the texture, painted, then glazed. This alone sounds daunting, but you have to factor that we have a lot of wall space and that our walls are 14-feet tall in the kitchen. Ugh. It took so long to complete. When I was finished, I was not 100% pleased, but it was so much work, we lived with it. The problem is that the glaze is really hard to get to look even and natural when your walls are so big. There are parts where the glaze took differently and is shiny, and places where it's dull. There are places where the glaze dried more before it was wiped off and is smudgy-looking. People say they don't notice, but I do. Also, there are several places that were nicked or were pulled off by painter's tape. I tried to touch them up, but it's very obvious. To really hide the imperfections, the walls would have to be re-done. All this being said, I'm actually considering painting the walls. I would probably do a muted olive green, much like the average between the two tones now but with no glaze. I went to Lowe's last night for a thousand paint chips which I have in the kitchen staring back at me.
I'll definitely keep you posted on the progress as I make up my mind. Thanks for all your help!
Tuesday, July 21, 2009
My Mary Makeover, Step One
I referenced my new housekeeping plan in a post on my family blog, and I thought I'd share how I've started. I did a lot of searching online, and I decided Flylady.com was the most similar to what I had in mind. It doesn't really fit my lifestyle, however, so I did a lot of tweaking. I needed a routine that:
1) Was very flexible and allowed for days off - if we're invited to do something last-minute, I refuse to let something like chores make me turn down the offer
2) Focused on keeping things neat and organized, not just appearing to be neat and organized
3) Met me where I am, not where I hope to be - I have a long way to go to get my house to neat and tidy, and it's not reasonable for me to have to get it to perfect before I can use a system to maintain it
4) Takes very little time per day - can reasonably be accomplished during naptime and still give me time to workout and shower (okay, I had a hard time saying "workout" with a straight face, but I'm adding that to my goals)
5) Keeps my house looking good all the time eliminating my last-minute hours-long cleaning marathon before company is expected
So, with that in mind, I set to the planning phase. The first step was to determine the things that I need to do every day to keep up with the house. Here is my list:
1) Empty and reload the dishwasher
2) Wipe down the kitchen counters
3) Wipe down the kitchen table and high chair
4) Make the beds
5) Clean up baby toys
6) Use the dust mop to sweep wood floors, and run the Roomba in the kitchen
If you're going to jump in to this project too, start by making a short list of things you would like to accomplish every day.
Yum!
 I saw a commercial for Yoplait Whips the other day suggesting freezing them and enjoying them like you would frozen yogurt. It is delicious! Go freeze some today for a cool and healthier summer treat.
Monday, July 20, 2009
Extreme Home Makeover
Okay, it's probably not that extreme, actually. But I need opinions. I've had several home improvement projects on my mind for a long time now, and I just need to make up my mind. First up - the kitchen. We textured and painted the walls long ago, and the counters and cabinets need some work. The cabinets are all solid, sturdy, and functional, so I'm just painting them. But I cannot decide which of my two ideas to go with. I either want to paint them a muted white, then do a chocolate glaze (something like these)
 or just solid black - something like this:
 Here are a few pictures of the kitchen. In case the colors aren't true on all computers, the walls are olive green with a walnut glaze. The appliances are stainless, the floors are neutral, and the countertops aren't staying.

 Alright, what would you do?
or just solid black - something like this:Here are a few pictures of the kitchen. In case the colors aren't true on all computers, the walls are olive green with a walnut glaze. The appliances are stainless, the floors are neutral, and the countertops aren't staying. Alright, what would you do?
Sunday, July 19, 2009
Barbecue Chicken Pizza
 We've been in a homemade pizza kick for awhile now, and this one was a huge hit. If you've never made a pizza at home before, definitely try this! It's simple and delicious.
Barbecue Chicken Pizza
1 tube Pillsbury pizza dough (found in the refrigerator section with the biscuits in a tube)
1/4 plus 1/8 cup barbecue sauce
1/3 cup cooked shredded chicken
1/4 red onion, diced
1 Tablespoon brown sugar
olive oil
shredded Parmesan cheese
fresh or shredded mozzarella cheese
Preheat the oven to 425 degrees. Grease a cookie sheet, and roll out the dough spreading according to package directions. (Note - I used a Pampered Chef pizza stone that I preheated the first time I made this recipe, and it was a disaster. The dough begins to cook immediately, and I was unable to spread it out properly. This time I used a regular cookie sheet that I did not preheat, and it was perfect. I only use the stone when I make my own dough.)
Meanwhile saute diced red onion in olive oil in a skillet over medium-high heat until translucent. Add brown sugar, and stir. Turn the heat to lo, and add 1/4 cup of barbecue sauce and shredded chicken, and stir to combine.
While the mixture is warming, spread 1/8 cup barbecue sauce over the dough to about 1/2 inch from the edge. Sprinkle with Parmesan cheese. Then spread the chicken mixture evenly. Top with mozzarella cheese.
Bake at 425 for 13-17 minutes or until the crust is browned and the cheese is brown and bubbling.
Monday, July 6, 2009
4th of July Recipes
 We had a really fun extended holiday weekend. Chris' family had a reunion with his mom's siblings and cousin. It was such a great time of catching up, watching fireworks, laughing, and eating and eating and eating. I love family get togethers! We had a big cookout on the 4th, a brunch at our house on the 5th, then a dinner at my sister-in-law's tonight. I tried some new recipes and some old favorites, and I wanted to compile them all here.
Broccoli Ramen Slaw
1 bag prepared broccoli slaw (by the bagged salads)
2 packs Ramen noodles, any flavor
4 green onions, chopped
1/4 cup salted sunflower seeds
1/2 cup white sugar
1/4 cup oil
1/3 cup cider vinegar
In a large bowl, combine slaw, crushed noodles (uncooked), green onions, and sunflower seeds. In a separate bowl, combine sugar, oil, vinegar, and the Ramen flavor packets. Pour the dressing over the slaw about 30 minutes before serving and refrigerate to allow the flavors to meld.
.jpg) Candy Bar Trifle
Candy Bar Trifle1 box of your favorite brownie mix baked in a jelly roll pan or a 9x13
2 packs of instant cheesecake or french vanilla pudding made according to package directions
1 tub of Cool Whip, thawed
a handful of your favorite candy bars
In a large bowl, fold the prepared pudding into the Cool Whip. Cut the brownie into squares, and line the bottom of a trifle bowl. Pour a third of the pudding/Cool Whip mixture on top, then sprinkle with chopped candy bar. Repeat twice more, and refrigerate until it's time to serve.
Grandma Trudy's Strawberry Cake
1 angel food cake (I always use store-bought)
1 pack strawberry Jello
1 tub of Cool Whip
1 pint of strawberries
1 pint of blueberies
Cut the angel food cake into squares, and fill the bottom of a 9x13 pan. Wash and slice the strawberries. Sprinkle about a 1/2 cup of the sliced strawberries among the angel food cake. Make the Jello according to the package directions, and pour it over the angel food cake and strawberries. Refrigerate overnight (or until set). Spread the entire tub of Cool Whip over the cake, then top with the rest of the strawberries and blueberries. Serve cold.
Chopped Antipasti Salad
1 head of Romaine lettuce, chopped
1/2 red onion, chopped
1/2 cup chopped fresh basil
3 Roma tomatoes, diced
1 cucumber, diced
1 cup diced fresh Mozarella
1 cup kalamata olives
1/2 cup chopped salami (I just used the thin deli-sliced, but you can use thick-cut)
1/2 cup chopped smoked turkey breast (again, I used thin deli-sliced)
1/4 cup Parmesan cheese
fresh ground black pepper
Dressing
1 part balsamic vinaigrette to 1 part Caesar dressing
Toss all ingredients immediately before serving.
For brunch, I served dishes that can be found here.
In the midst of the weekend I also made homemade ice cream that turned out to be out of this world. That recipe can be found here and here. Do yourselves a favor, and go make this now! Delicious.
I hope you and yours had a wonderful holiday weekend! Thank you to all of our servicemen and women who made/make such a celebration possible.
Tuesday, June 30, 2009
4th of July Kids Crafts
I've seen the cutest 4th of July craft ideas while scrolling through blogs. If you're looking for a way to decorate your house for the 4th, try out some of these.
ScrumdillyDo's Spinning Fireworks using a salad spinner
The Crafty Crow's list of July 4th projects
Celebrations' Lawn Rockets
Kaboose's Patriotic Flower Pot Candle Holders
Patriotic Bubble Wands
Uncle Sam's Hat Treat Cups
ScrumdillyDo's Spinning Fireworks using a salad spinner
The Crafty Crow's list of July 4th projects
Celebrations' Lawn Rockets
Kaboose's Patriotic Flower Pot Candle Holders
Patriotic Bubble Wands
Uncle Sam's Hat Treat Cups
Alice
I just heard of the greatest website, Alice.com. During my big monthly grocery trip last night, my daughter was a bear. She was tired, so she was in no mood to be patient. But we were out of milk, eggs, and bread, so the trip was a must. Anyway, I was standing in line trying to prevent her from throwing everything out of the cart thinking, "I wish I had a personal shopper to do this for me." I hate grocery shopping. I always have, but adding a 15-month-old to that trip makes it even less appealing. This morning I ran across this website. It is great. Go check it out. You pay a little more, but the concept is phenomenal. You enter the products you use, the frequency you purchase them, and they remind you when you're due. They also find all of the coupons associated with the items in your products list to alert you when you can save. Oh, and shipping is free! Awesome.
Friday, June 26, 2009
Best Burgers Ever
 We've been experimenting with all of our garden veggies and herbs a lot around here, and this is, by far, our favorite experiment. I made some sliders with basil and chives, and they're a hit. Here's how:
Best Burgers (Sliders) Ever
1 lb ground beef
1 bunch basil
1 bunch chives
handful of mozzarella cheese
2 Tablespoons Worcestershire sauce
salt and pepper
Dump everything into a bowl, and mix by hand until everything is evenly distributed. I use Rachael Ray's tip to divvy up the meat. She presses it into the bottom of the bowl and scores it with her hand to get an even amount of meat into each burger. I made 6 small patties because a normal-sized burger is too much for me. Grill on each side to your desired doneness, and enjoy! I served these with grilled onions, colby-jack cheese, and on homemade buns (recipe can be found here).
Wednesday, June 24, 2009
The many, many leaves of basil
My basil plant (bush!) is out of control. It's grown to 2 feet high and is as big around as a beach ball. I've harvested basil just about daily to encourage it to grow wider and not tall and stalky. I've made everything from my basil chicken previously posted to marinaras, spaghetti sauces, lasagna, and everything in between. I've given it away and, ultimately tossed some which grossely conflicts with my pioneer tendencies. =)
Anyway, my sister had the best idea for a way to preserve the fresh basil. She suggested chopping it and freezing it in ice cube trays. I did, and it worked perfectly! I used my first few cubes in dinner last night. Just clean it, chop it up, spoon it into ice cube trays, cover it with water, and freeze. You can do this with any fresh herbs. Freeze mint into ice cubes, and use it to cool off iced tea. Freeze fresh cilantro, and use it for your salsas. The possibilities are endless.
Thanks for the great tip, Amy!
Tuesday, June 23, 2009
Sandy Feet
 I'm taking a break from my all-day cooking session to share this with you. While I was waiting for my pot to come to a boil, I was flipping through July's Parents Magazine and saw the cutest thing. This is a kit to carry with you to the beach to make a keepsake out of your child's footprints in the sand. What a great idea! Of course, you could save yourself a little bit of money and buy plaster of paris to do this on your own. But this comes with all the tools you'll need for mixing, and it's packaged in the sweetest bucket. This would make a great gift idea too. You can buy them here. Isn't it precious?
Friday, June 19, 2009
A House Staple
When I was in college I lived in a sorority house my sophomore through senior years. One night Chris dropped in and cooked dinner for me. Thankfully he had enough supplies to feed the entire house, because the scent of his meal travelled upstairs causing everyone to come out of the woodwork. It was such a fun evening, and everyone in the house fell in love with him then and there. He made simple quesadillas, and we've had them at least once a month ever since that evening in 2000. Here's the basic recipe:
Chris' Quesadillas
flour tortillas
chicken, fully cooked
salsa
cheese
butter
Directions:
Shred, chop, or dice your chicken. In a skillet over medium heat, combine chicken with as much salsa as you like (we usually use about 1/4 - 1/2 cup to each chicken breast), and cook until bubbling. When the salsa has reduced and thickened, turn the heat to low.
Meanwhile, heat a skillet over medium-high heat. Butter one side of each flour tortilla. Put the tortilla buttered-side-down in the heated skillet, and sprinkle with cheese. Add a scoop of the chicken and salsa mixture, and spread to cover. Sprinkle again with cheese, and top with another tortilla buttered-side-up.
Cook on each side until the tortilla is browned and crispy. Slice and serve with sour cream, guacamole, pico de gallo (make your own by mixing 1 chopped tomato (seeded) with 1 chopped jalapeno, 1/4 diced red onion, 1/4 cup chopped cilantro, salt, pepper, and the juice of half of a large lime), or cilantro.
Slice and serve with sour cream, guacamole, pico de gallo (make your own by mixing 1 chopped tomato (seeded) with 1 chopped jalapeno, 1/4 diced red onion, 1/4 cup chopped cilantro, salt, pepper, and the juice of half of a large lime), or cilantro.In these quesadillas, I used my own homemade salsa. Here's the recipe:
1 large can of diced tomatoes (you could absolutely use whole tomatoes here too)
1/2 cup fresh cilantro
1/2 sweet onion
2 cloves of garlic
1/2 jalapeno*
salt and pepper to taste
Drain the tomatoes, but reserve the juices. Add the tomatoes to a food processor or blender. Add the cilantro. Grate the onion and garlic, and add to the tomato mixture. Then, finely chop the jalapeno, and toss it in. Pulse the mixture, and add the juices back to your desired consistency. Then add salt and pepper to taste. Since all of the ingredients are pre-chopped or grated, the food processor only serves to meld the flavors, so do not overmix. Store in the refrigerator up to 1 week (although I've never had this last even 2 days!).
*Obviously you can change this to meet your taste for spiciness. I usually seed the jalapenos and remove the white parts before I chop it up. Using 1/2 seems to be very mild, and even Hannah enjoys this recipe.
Wednesday, June 17, 2009
My Garden Mutt
I've been really busy lately, so there's been a lot fewer posts over here. We had a tornado last week, so we spent quite a bit of time cleaning up. We were housesitting next door, and we spent almost every waking moment swimming in her pool which she so graciously offered. Tomorrow is Chris' birthday (it's a BIG one!), and Sunday is Father's Day. Plus we're going away for our anniversary in a couple of weeks, so we've been swamped.
The garden certainly hasn't stopped producing in the meantime. I don't think I've shared this, but I have a pile of grass and weeds that I've pulled out of the garden sitting just outside the fence. I haven't moved it because I noticed a vine growing awhile back, and I thought I'd wait to see what it was. I planted everything in the garden from plants I purchased except for the pumpkin, green beans, and sweet peas. I thought at first that it may be a pumpkin seed sprouting, but I just can't figure it out. The vines look exactly like the cucumber, the leaves are a mix between the watermelon and the zucchini, and the flowers look nothing like any other plants. Now it's producing fruit, so I'm curious to see what that turns out to be. It is, by far, the biggest plant in the yard. So incredibly strange. We refer to it, lovingly, as our "Garden Mutt." Any guesses as to what it could be?

More garden progress:
Look at these creepers! There's no longer room between them to walk. Crazy.
 Finally we have 2 sugar snap peas. Unfortunately the plant is succumbing to the heat and is almost all dead, so these are probably the only two we'll yield. Bummer.
 Here's the first squash. We finally have some female flowers on the zucchini, so I expect those to spring up any time now.
 This morning while I was watering, I reached down to move some of the watermelon vines that were trying to overtake the squash, and I found these cuties! I've never grown watermelon before, and I'm so excited to watch them develop. The bottom picture is a watermelon about the size of a golf ball. So fun.

The garden certainly hasn't stopped producing in the meantime. I don't think I've shared this, but I have a pile of grass and weeds that I've pulled out of the garden sitting just outside the fence. I haven't moved it because I noticed a vine growing awhile back, and I thought I'd wait to see what it was. I planted everything in the garden from plants I purchased except for the pumpkin, green beans, and sweet peas. I thought at first that it may be a pumpkin seed sprouting, but I just can't figure it out. The vines look exactly like the cucumber, the leaves are a mix between the watermelon and the zucchini, and the flowers look nothing like any other plants. Now it's producing fruit, so I'm curious to see what that turns out to be. It is, by far, the biggest plant in the yard. So incredibly strange. We refer to it, lovingly, as our "Garden Mutt." Any guesses as to what it could be?
More garden progress:
Look at these creepers! There's no longer room between them to walk. Crazy.
 Finally we have 2 sugar snap peas. Unfortunately the plant is succumbing to the heat and is almost all dead, so these are probably the only two we'll yield. Bummer.
 Here's the first squash. We finally have some female flowers on the zucchini, so I expect those to spring up any time now.This morning while I was watering, I reached down to move some of the watermelon vines that were trying to overtake the squash, and I found these cuties! I've never grown watermelon before, and I'm so excited to watch them develop. The bottom picture is a watermelon about the size of a golf ball. So fun.
Subscribe to:
Comments (Atom)